Google Tag

Showing posts with label B-FOOD. Show all posts

Friday, July 14, 2017

Popeyes in South Africa


So for those who know me, you know I'm a big fan of fried chicken, heck! part of the reason the name of this blog has to do with the crispy golden food. While my allegiances do tend to favour the one particular brand I'm always one for trying something new.  Which brings me to the topic of today's post, yesterday saw the first franchise store of the iconic American restaurant brand  "Popeyes Louisiana Kitchen" open in South Africa. The store which is based in the Sandton City Mall food court has begun serving it's authentic Louisiana-inspired chicken to much fanfare as the queues were testament to this. Guests experienced the mouth-watering menu, with the favourite being the bone-in fried chicken which is available in two flavours, spicy or mild. There is also boneless options for those who prefer their chicken that way and a wide variety of signature sides, one of the favourites being cajun fries. 

Jaye Sinclair, the Chief Executive Officer for South African based, Siyaghopa Trading Group, the people responsible for bringing Popeyes to SA had this to say. "We're very excited to join the Popeyes family and bring the iconic brand to South Africa. We think our South African guests will love the signature blend of spices and flavours we'll bring the table". 


South Africa being a nation that loves their chicken, will enjoy the distinctive flavours of Popeyes fried chicken and tasty cajun fries. Here are a few facts about Popeyes to get you ready for your first experience. 

Where did Popeyes get its name?

  • Everyone thinks Popeyes got its name form the spinach-loving cartoon character, but the name actually came from a famous fictional 1970's detective, Detective Jimmy 'Popeye' Doyle, the fictional lead character of the movie, 'The French Connection', is the real insparation behind the brand name. 
Popeyes around the world. 
  • Popeyes currently has restaurants in more than 25 countries.
  • The Popeyes restaurant in Sandton City, Johannesburg is the only Popeyes on the continent of Africa and the first to open in South Africa.

What makes Popeyes so unique?
  • Popeyes founder, Al Copeland, created one-of-a-kind chicken recipe that is marinated in Louisiana-inspired seasonings, then hand battered, breaded and fried. Creating a juicy on the inside, crispy on the outside chicken guests have been craving for more than 45 years. 
  • Popeyes has proprietary seasonings that are used to marinate the chicken for 12 hours, creating the richly seasoned flavours in both the mild and spicy versions. 
  • At least 60% of the employees at the Popeyes in Sandton City are first-time work-seekers from the Harambee Youth Employment Accelerator who have been trained to meet Popeyes international requirements.
Spice...and all things nice
  • At Popeyes, flavour is everything! The Popeyes chicken recipe is based on a 300 year old culinary tradition, which incorporates a fusion of cooking styles, a rich blend of proprietary seasoning and spices sourced from around the globe, including Africa. 
  • Popeyes offers both well-seasoned mild chicken as well as a more spicy chicken option that South Africans are bound to love. 

What's a biscuit?
  • Have you heard of the famous American Biscuit but not had the pleasure of tasting? Ger your taste buds ready - this legendary American side dish is a specialty of Popeyes!
  • The delicious and freshly baked Popeyes Buttermilk Biscuit join a wide selection of authentic Signature Sides available on the local menu. 

For more information on Popeyes and to gander at their menu, visit www.popeyes.co.za and follow Popeyes South Africa on Facebook, Twitter and Instagram

*Popeyes Louisiana Kitchen South Africa will serve Halaal chicken and is certified by the South African National Halaal Authority. (SANHA)


Wednesday, June 17, 2015

Recipe: Deconstructed Chicken and Mushroom Pie


I cook all the time, more than often things don't come out as how I thought they would but when they do, I blog about it. I love chicken and mushroom pies, its probably my favourite pie and having tried out the pot pie version of it a while back recently I decided to add a twist to it and modernise it a bit. Thus creating, the deconstructed chicken and mushroom pie! I thought I'd make it since it wouldn't require a lot of work but it was, though worth the effort. 


Ingredients:

  • 2 Skinless Chicken Fillets (marinated with garlic, green chili and spices)
  • 6 Button Mushrooms
  • 1 Large Potato (mashed  until creamy and smooth with butter and milk)
  • 5 Tbsp of Flour
  • 2 Tbsp Cooking Oil
  • 1 Onion Chopped
  • 1 Green pepper Chopped
  • 2 Cups Milk
  • 2 Tbsp Butter
  • 1 sheet puff pastry (10cm x 10cm)

Method:
After marinating your fillets, coat them with the flour and shallow fry them until golden and crispy, you can leave them in a preheated oven to crispen more and remove excess oil. 

To a pot, add your onion, green pepper, mushrooms and oil. Fry only the onions become limp and mushrooms become dark in colour. Add your 2 tbsp of butter and 2 tbsp of flour. mix continuously until the paste is brown in colour, then add the milk. You can add some seasoning to the milk. Stir on high heat until the sauce thickens. 

Cut your sheet of puff pastry to a suitable size that will fit your plate. For added effect, I brushed the top of mine with milk and sprinkled some sesame seeds on top. Bake in the oven until puffed up and golden brown in colour. 

Boil large potato, peel and mash, whilst adding butter and milk to get a creamy texture,  


Plating:

First spread the mash at the bottom of the plate, give it good height as you want it to be a generous element on the plate. There after place your chicken breasts on top of the mash then pour the mushroom sauce over the fillets. Lastly add the puff pastry top to the dish. It's not that hard to make, just uses a lot of dishes but damn tasty!


Friday, August 8, 2014

Recipe: Seared Tuna

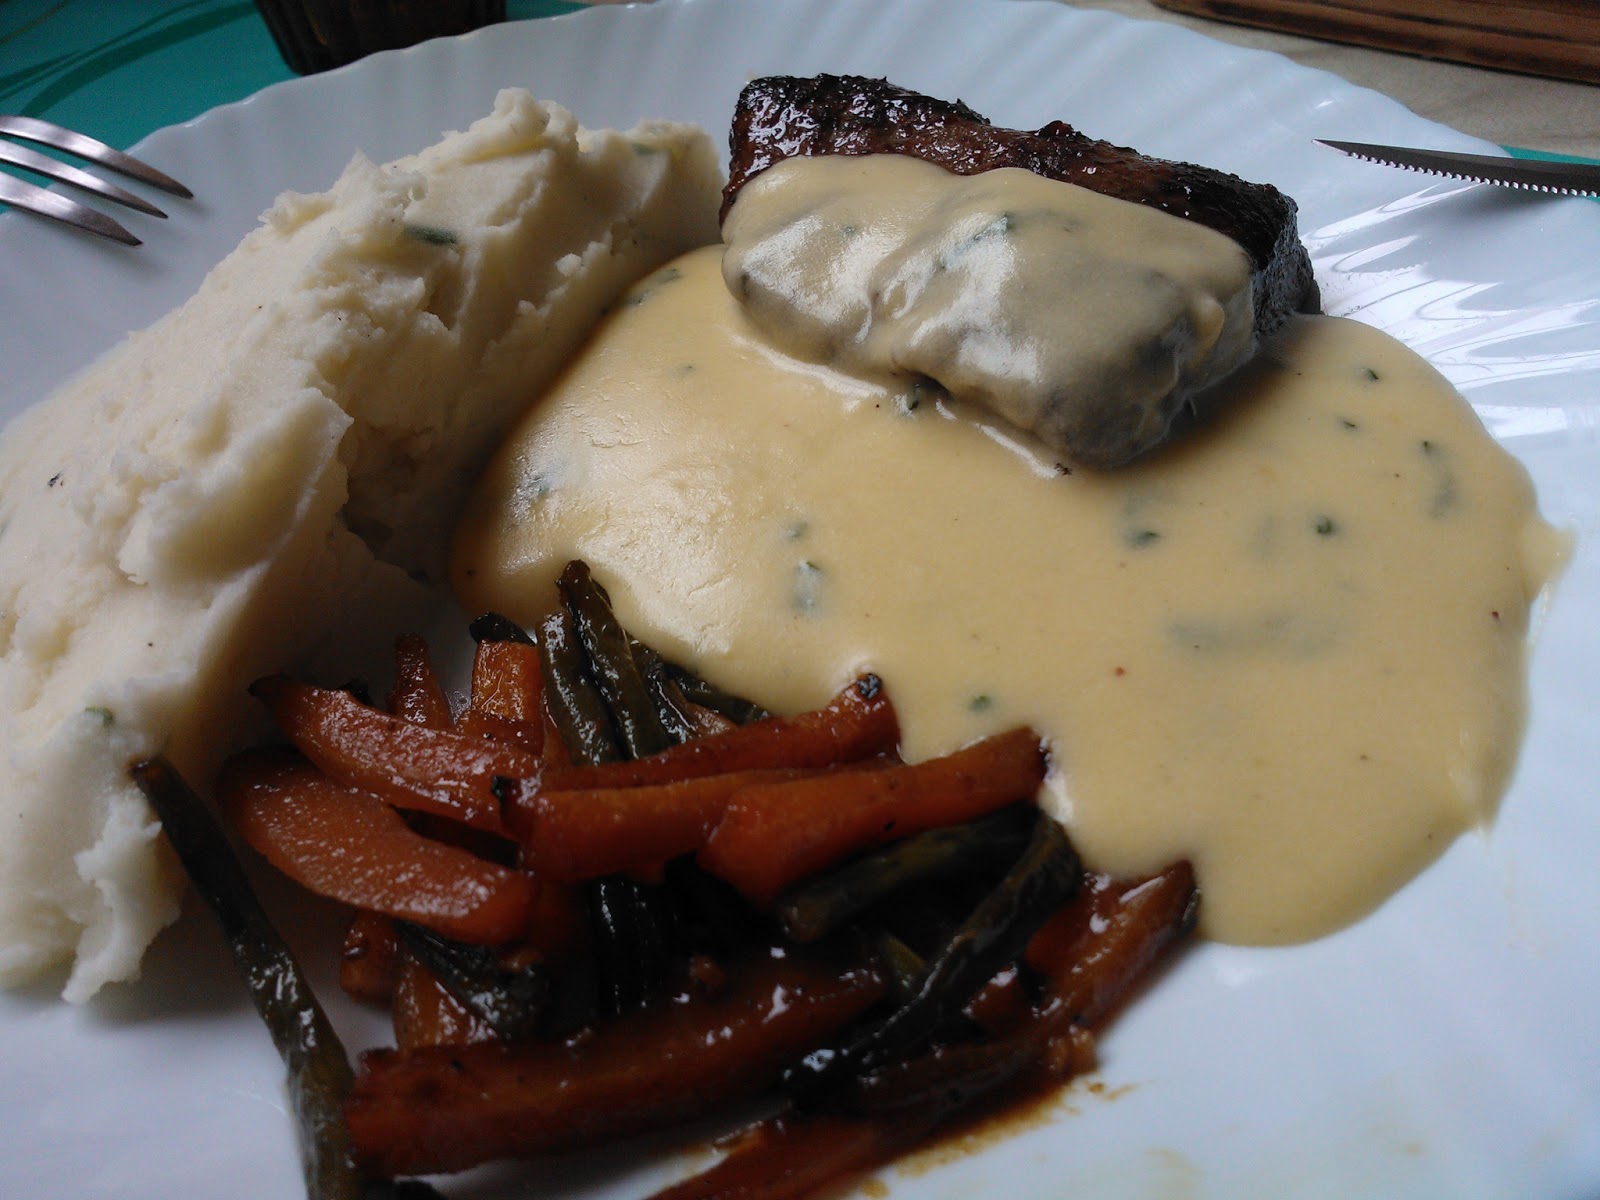
I don't consider myself to be a Masterchef but there are times I like to be fancy in the kitchen and my recent acquisition of new bigger and better George Foreman Grill has spurred this allowing me try out idea's of meals my brain has thought up. I eat far from healthily and my cooking is just about the same but seeing that this was a "health grill" my inner #fitfam wanted to break free when using it, so hence today's recipe came about. It's my take on Seared Tuna, its served with grilled green beans on a bed of mash and lemon butter sauce.


Ingredients


Fish:
  • 2 Tuna Steaks (weight can vary)
  • 1 clove garlic
  • 1 part fresh ginger
  • 1 green chili
  • 1 teaspoon olive oil
  • 1 teaspoon soy sauce
  • 2 soft cooking potatoes
  • handful of green beans
  • salt
  • black pepper

Mash:
  • 2 or 3 soft cooking potatoes
  • cup of milk
  • pinch of salt and black pepper

Lemon sauce:
  • 2 tablepoons butter
  • 1 teaspoon cream
  • 1 table spoon lemon juice


The Fish


Mince the garlic, ginger, green chili into a paste, add to a bowl with the olive oil and soy sauce, salt and black pepper and mix to form the marinade. After washing and draining the tuna steaks, rub the marinade into each of the steaks and allow to rest in a covered bowl in the fridge for about 30 minutes to an hour. I also added the green beans to the bowl so it can marinate with the fish as both of this will be going on the grill. Pre-heat the pan or grill, making sure its hot enough to sear the outside and not cook the fish right through as this will over cook it. Sear each side of the fish for about a minute and allow the green beans to grill on the side.


The Mash


Boil the potatoes in pot of water until they become soft, then drain the water and allow them to rest and cool. Peel off the skin and add the potato into a mixing bowl, using a flat spoon, begin to mash the potato while adding the milk. Using a flat spoon ensures that you get a smoother mash and the milk makes it fluffy and creamy, add some salt and pepper to taste

The Sauce


In a pot, melt the butter on the low heat as we are not cooking it, rather just wanting to melt it. Stir in the cream and lemon juice till it mixes together, you can add some spices or herbs to taste. I added some dried Italian herbs.

The Plating


In a deep plate, mold the mash into a bed type shape, place the grilled green beans lengthwise on top of the mash. Place the steaks on top of the green beans and then pour the sauce over the fish and serve.

Friday, July 12, 2013

Recipe: Creamed Spinach Pizza

With my fasting month around the corner, I'd thought I share with you one of my favourite vegetarian creations. Well I cant really take credit for it as there are some restaurants that make the very same dish. We'll start of with the ingredients, I wont give the recipe for the pizza dough since many prefer different ways on making theirs.

Ingredients.


  • tomato sauce
  • spinach
  • butter
  • cream
  • milk
  • mushrooms
  • black olives
  • feta
  • cheddar cheese
  • mozzarella cheese
  • salt
  • ground black pepper
  • garlic flakes
  • italian herbs
  • dried basil

Chop your spinach and cook it with 1 tablespoon of butter, add 1 teaspoon of salt and 1 tea spoon of ground black pepper. Once the leaves have wilted, add your chopped mushrooms. Allow for them to turn dark grey/ black. Add 100ml of cream and 100ml of milk. Allow to cook on low heat. Whilst adding your garlic flakes and italian herbs. If the mixture doesnt thicken, add a teaspoon of cake flour. Once the creamed spinach is ready, take off the stove and allow to cool.


On your pizza dough, spread your tomato sauce making sure its covered equally. Sprinkle the dried basil over and if you want to you can also drizzle some olive oil over it. Then add your creamed spinach mixture to the top, again spreading it evenly. 


Then proceed to add the olives, and the cheeses, being feta, cheddar and mozzarella. You can add more garlic flakes and ground black pepper to the top if wanted. Put it in a preheated oven at 180 and cook until the cheese has melted. Slice and enjoy! 

Tuesday, March 12, 2013

Recipe: Roasted Ostrich Fillet

Well I got into the kitchen recently and made something different. There's only one type of bird I'm used to eating and that is chicken, I've tasted duck once or twice but never took a liking to it and the same goes for turkey but this time I decided to tackle a bigger bird. Ostrich, now its not like any bird meat you've seen, to start off its red and the package it comes with puts me off because it looks like its soaked in blood but I decided to go ahead and try it anyway. They say the meat is pretty healthy for you, its lean and doesn't have much fat. Here's how I went about cooking it.


Ingredients.

Ostrich fillet (200-400g)
1tsp salt
1 tsp black pepper
1 tsp brown sugar
2 tsp olive oil
2 tsp soy sauce
1 tsp English mustard
1 tsp golden syrup
thyme

1 tsp Robertsons Italian herbs


Extras

1 carrot, cut into strips
green beans, cut into long strips
1 large potato
half cup of milk
salt and pepper

Method

Mix ingredients in a bowl (besides the fillet), once everything is mix, massage it into the fillet. Once done, cover with cling film and pop it into the fridge. I let mine marinate over night so the flavour soaked in. Now to cook it, heat up a frying pan with some olive oil, make sure its nice and hot. We're not going to cook it, just seal it, so fry on one side for about 1 minute, then turn and seal for 1 minute. Once you're done, put the fillet in an oven tray along with what ever juice was left in the pan and from the dish it was marinated in. add your strips of carrots and green beans and cover with foil. Pop it into a preheated oven at 220 degrees. Allow to cook how you desire, I let mine get well done, it wasn't as dry as I expected and it still retained load of moisture.


I also made a smooth mash potato, boil the potato till its cooked. Mash in a bowl, add the milk and salt and pepper to taste. Keep on mixing till its nice and smooth.


I also made a quick cheese and spinach sauce, equal quantities butter and flour in a hot pan. Wait for the mixture to brown, add some milk while keep on stirring. add some cheddar cheese (I think this is the best cheese to use in a sauce). Once its thicken, take off the stove and add some chopped spinach and stir it in. Pour the sauce over the fillet while eating, it really is an awesome side! Enjoy.


Friday, February 22, 2013

Recipe: Tandoor Roast Leg of Lamb

 
Ingredients
 
1 leg of lamb (between 800g-1kg)
2 bulbs of garlic
whole black pepper corns
fresh rosemary
fresh thyme
2 tsp olive oil
3 tsp minced ginger
1 tsp minced garlic
6 minced red chilli's
5 tsp Tandoor spice chili powder or ordinary chili power.
1/2 cup yoghurt.
2 onions
2 potatoes
 
marinated lamb before roasted
Method
 
Wash and rinse the leg of lamb thoroughly, make deep slits into the meat, clean the garlic and stuff the cloves into these slits made in the leg. Also stuff the whole pepper corns, rosemary and thyme into the slits. In a large bowl, mix the olive oil, minced ginger, minced garlic, minced red chili's, tandoor spice and yoghurt. Once everything is mixed properly, rub the mixture onto the leg of lamb, make sure you massage the mixture into the meat as you want the flavours to soak in. Cover the leg and place in the fridge to marinate over night. After a nights rest in the fridge, place the leg in a deep oven tray and preheat the oven to 180 degrees. 
 
Roast with potato and onions on the side
Peel and wash the onions and potatoes and cut into chunky wedges and place into the tray along with the leg to roast, turn after 15 minutes and allow the other side to roast there after repeating the process.Turn the leg only twice then allow it to roast on 140 degrees. It depends on the individual on how well done they want their roast, I liked mine well done with the meat falling off the bone so it took just under 2 hours to roast.
 
adding the stock to make the gravy
You can make a simple gravy for it like I did if you find the meat might be dry. You'll need two onions and two tomato's, both must be minced fine and added to a pot with 1 tbsp olive oil and 1 tsp minced garlic. When turning the leg of leg, scoop some of the excess water and add to the pot as this will serve as the stock. Allow the gravy to thicken and use this to have with the meat.
 
tomato gravy
 bon appetit!


Tuesday, August 21, 2012

Recipe: Grilled tomatoes

Seeing that I've been fasting for what seems like a decade but actually was a month, I was getting tired of the usual veggie food. I mean there's only so much pizza, pasta and cheese toast you can eat. So I decided to get creative in the kitchen, I wanted something simple yet filling but doesn't take a lot of time to make. I know the title reads "grilled" but it actually is pan fried.Its sort of a bruschetta but can be eaten as a light meal too. Here's how to make it.


Ingredients.
  • 2 large, red, firm tomatoes
  • bread of your choice
  • 2 table spoons olive oil
  • cream/ cottage cheese
  • dried Italian herbs
  • garlic flakes
  • crushed black pepper
  • spring onion


Recipe

Begin by slicing your tomato, you'd want a nice thick slice so that it still maintains its shape when frying. In a frying pan, add your olive oil. Wait for the oil to heat up before placing your tomatoes in, once in sprinkle your dry spices and herbs. For a bit of kick, you can sprinkle a chilli power. Cook the tomato for about 2/3 minutes on either side. While this is being done, slice your bread also keep it a little thicker than usual. You can either pop it in the toaster or the oven, just for a short while to crispen it, we don't want it hard in texture. Spread a generous amount of you cream/ cottage cheese on the bread then place your fried slices of tomatoes on top. Garnish with the chopped spring onion and you're ready to eat!


Tuesday, July 10, 2012

Recipe: Chicken pot pie

I don't consider myself a Masterchef by any stretch of the imagination but I do love to cook! There's something about getting creative in the kitchen that spurs you on to want to try more and more different things but then there is the cleaning up bit but lets not focus on that right now. Being in the midst of winter, its time to have meals that are hearty and rich that warms you up, like soups, pies and stews. A lover of pastry myself I cannot refuse a good pie but I never did attempt to make one from scratch, I suppose I took the easy way out by making a pot pie but it still proved to be a challenge!


Ingredients:

4 skinless chicken fillets
1 teaspoon olive oil
1 peeled and chopped red onion
1 chopped chilli
1 clove garlic chopped
7-8 regular sized button mushrooms chopped
1 teaspoon salt
1 teaspoon black pepper
1 teaspoon english mustard
Italian herbs (basil, thyme, oregano, rosemary)
500ml milk
250ml chicken stock
1 table spoon flour
2 table spoons butter
1 roll puff pastry

Method:

In a belly pot, add your olive oil and red onion. Allow too brown then add you mushrooms and garlic, there after your chopped chilli. After the mushrooms have been cooked, add the chicken breasts which you need to cut into cubes. Cover the lid as this will allow the chicken to steam up and retain moisture. After your chicken is more or less cooked, add the butter, chicken stock as well as the milk. Stir well while the heat is high, as you continue stirring, add your spices (salt, black pepper, mustard, italian herbs). Keep on stirring till the mixture starts to boil. Once it has a good consistency, add the flour to just thicken it a bit. Allow for it to rest and cool down. Pour the mixture into an oven safe dish (preferably rectangular) which should be greased. Prior to doing this, roll out your puff pastry and measure it so it fits over your dish. Leave an extra centimeter or so around the edges as the pastry does tend to shrink and we don't want the filling to dry out.
Cover the dish with the pastry once your filling is in the dish, tuck the pastry around the edges. You can glaze the top with milk or egg wash and garnish with sesame seeds. Pop it into the oven for 45min to an hour on 180 degrees, make sure your dish is centrally place and not too close to the element otherwise your pastry will not puff and just end up as a hard crispy crust...like mine. If you do get it right, enjoy! but watch out, its hot!

browning onions and garlic

onions, chicken and mushroom

milk and stock added

poured into dish
covered with pastry


Sunday, April 15, 2012

Recipe: Alfredo revised

Being a Hindu and of Gujerati decent, I find myself being told to fast (abstain from eating meat) quite often in my life. Heck, by right Gujerati's are meant to be full on vegetarians! Luckily my family saw past that one, not sure how my life would have been without KFC!

Anyway, moving along, as mentioned before I do have to fast a lot and a few Sundays back I was tasked to make some lunch. I really wanted to have an Alfredo but instead of opting for the usual Alfredo, I decided to change things around abit. Here's how it went down.


Ingredients

200g tagliatelle pasta
1 tsp salt
2 tbsp butter
half cup flour
500ml milk
50-80g Parmesan cheese
Italian dried herbs
black pepper
english mustard powder
2 mushrooms
1 green chilli
1 clove garlic crushed
1 tsp olive oil
2/3 fresh chives
2 sticks fresh thyme

Method

Start off by putting the pasta to boil, I find the tagliatelle to be rather long so I break them in half and put them into a pot of boiling water with a pinch of salt and some oil.


Next step is to start the sauce going, in a sauce pan add you butter and wait for it to melt. Once melted, add your flour and stir continiously with a wooden spoon. Once the mixture has turned into a paste and turned golden brown, add your milk and continue to stir. You have to keep on stirring so your sauce stays smooth and will have no lumps. Add your salt, mustard, black pepper, parmesean cheese and Italian herbs. Keep stirring until the sauce has a thick texture, remove from the hot plate and stir in your chives and thyme.


Now, this is where things take a slight turn. In a large frying pan, add the olive oil, crushed garlic and chopped chilli.


Slice the mushrooms and add to frying pan. Drain the pasta well making sure all of the water is out. Allow to stand a cool for a bit and then add it to the frying pan. Try to crispen the pasta while turning regularly.


Once done, plate the pasta in a deep plate, pour some of the sauce over and enjoy!


Thursday, June 23, 2011

Recipe: The fried Chicken

Haven't done a recipe blog in a while and in the interim I have been messing up the kitchen, i.e cooking. So as the name of the blog is synonymous with the fried chicken, today's recipe is exactly for that! I tried many methods and recipes but after watching that Texan heavy weight Paula on the food network I figured out why mine kept getting messed up.

Fried Chicken burger with onion rings, crumbed mushrooms and chips
NB: This recipe I just used skinless chicken fillets as I was making them for burgers but you can used chicken pieces, with or without skin. 

Ingredients:

400g Chicken Fillets
1 tbsp oil
Crushed garlic
Minced green chilli
Worcestershire sauce
2/3 cups bread flour
2 tsp salt
2 tsp black pepper
2 tsp mustard powder
2 tsp chill powder
2 eggs

There is quite a bit of prep needed for this so make sure you have adequite time.

Prep

After washing and draining your chicken, add it to a bowl with the oil, chilli, garlic, Worcestershire sauce, and 1 tsp  each of the salt, black pepper, mustard powder and chilli powder. Mix all the ingredients well into the chicken. Allow it to marinate for 15-20 minutes in the fridge.

Chicken left for marination
While the chicken is marinating, crack the eggs into a bowl and whisk them till they are a smooth texture. In another bowl add your flour and the rest of the salt, black pepper, mustard powder and chilli powder. Use a spoon to mix the flour. Have a tray handy to place the coated pieces as well, lightly sprinkle flour onto the tray to avoid sticking.

egg wash
Once the chicken is done marinating, we can start the coating process. First take the chicken, dip it into the egg. Make sure it get soaked all round since we want the flour to coat it evenly. There after allow it to drain the excess egg then roll it in the flour mixture.


After coating all your chicken pieces with the flour, comes the part I learnt from Paula. "We gonna dip it and coat it a second time yall!" Yes you read right, take the already coated chicken and repeat the process of dipping it in the egg and flour. This gives the chicken a nice thick coating and prevents it from braking while frying.


Once you've coated all your chicken, its time to fry these suckers. Make sure you have a small belly pot with a lid. Not alot of oil is needed as we will be frying one piece at a time but make sure there is enough to cover the chicken. I say use a pot with a lid as the chicken does tend to splatter the oil when frying so this would help minimize the mess also it helps steam the chicken and not make it chewy.


Fry until golden brown and then place on a sheet of grease proof paper as this helps drain out the excess oil. As I said, I made burgers so it was served in a bun with mayo, lettuce, cheese and a slice of tomato. If you chose to use pieces, you can have them with sauce, gravy or what ever you desire. There maybe left over egg and flour from the coating, I normally slice up some onion rings and mushrooms to use it up as shown in the first picture.

Enjoy!